Showing posts with label export. Show all posts
May 15, 2024
#MakeoverMonday 2024 Week 20 - Exporting Freedom, One Bullet at a Time
bloomberg
,
color
,
data prep
,
export
,
guns
,
highlight
,
label
,
line
,
LOD
,
Makeover Monday
,
path
,
tableau
,
United States
,
weapons
No comments

I struggled mightily with this week's #MakeoverMonday. My goals was to replicate the original visualization by Bloomberg.
I knew I need to create path to connect the US at the center to each country.
I wanted to make the US the center of the of the map.
Sounds simple, right? I made it way harder than it needed to be.- I overthought the data prep.
- I forgot how to create the paths.
- I couldn't get the math right to offset the longitude.
The coloring and labeling was straightforward for me.
Adding the US as a circle in the middle was pretty simple.
To overcome the problems I facedI looked at a previous visualization I created using paths.
- I opened the workbook and the data to see the configuration.
- I replicated that set up by adding a second set of records to the data set.
- Viewers on the livestream helped me figure out the math to offset the longitude.
The simplest way to explain the location of each country is to think of the lat/lon for the US as 0,0. Then you compare that to the lat/lon for every other country to create the offset.
I got there in the end. What do you think? Was the juice worth the squeeze?
Click the image below to access the viz.
August 14, 2018
The Greatest Tableau Tip EVER: Exporting Made Simple!
csv
,
dashboard
,
export
,
image
,
Marc Rueter
,
tableau
,
tips
,
URL
147 comments

UPDATE: 14 August 2018
Version 2018.2 of Tableau introduced Dashboard Extensions. To make exporting data from dashboards as easy as possible, The Information Lab CTO and Zen Master Hall of Famer Craig Bloodworth created the Export All extension. What does this do?
If you have at least version Tableau 2018.2, then I'd highly recommend the use of this extensions versus the technique outlined below.No matter how much you try to convince them, there will always be some users who want to reduce your beautiful Tableau charts to a table of numbers in Excel. So if they're going to do it anyway, you may as well give them a simple, controlled way, generating one Excel workbook and not a bunch of CSVs. With the Export All extension for Tableau Server you can place a simple button onto your dashboard, choose which sheets & columns are exported, and with one click your users can download a clean & tidy Excel workbook.

We’ve all heard this question before: How can I export a CSV in Tableau? To be honest, it’s quite the pain and way more difficult than it should be. There have always been a few options.
- Users can click on a specific sheet on a dashboard and then export that via the tiny button on the toolbar, but that has a few of its own problems: (1) You may not want to show the toolbar therefore making the export impossible, (2) People have to be trained to know exactly where to click to get it just right, and (3) You have no control over the output of the CSV.
- You can export a CSV using Tabcmd, but that’s not useful for the average dashboard consumer.
- You can add .csv to the end of the URL like http://[Tableau Server Location]/views/[Workbook Name]/[View Name].csv. But again, you never know what that output is going to look like.
Yesterday I learned an incredibly valuable trick that would make option 3 (adding .csv to the URL) export exactly the CSV you want. Let’s look at an example.
On this dashboard, notice how I added an Image object (I used an Excel icon) on the dashboard. I’ve floated it to the upper right and made it small. All the user has to do is click on that icon and they get a nice CSV. Go ahead, try it!
Did you try it? If you did, and you opened the CSV, you may have noticed this looks remarkably like the data that you would hope to get if you exported the data for the line chart. But I didn’t export the line chart at all. Here’s the trick.
- Add the image icon on the dashboard and place it wherever you like.
- Add a URL link to the image. In the dashboard above, the URL is http://public.tableausoftware.com/views/ExporttoCSV/Dashboard.csv?:showVizHome=no.
This is where the magic sauce happens. When you add .csv to the end of a Tableau URL, Tableau will export the first sheet on the dashboard alphabetically. Yes, it’s that simple! And it’s totally undocumented. Special thanks to the one and only Tableau Jedi Mark Rueter for this tip! But note that Tableau orders upper case before lower case. - What I did was float a sheet named AExport onto the dashboard. I changed the height to 1 and made everything white and transparent and chose Fit Entire View so that it would be inconspicuous. I had to name it with a capital A so that it would be the first sheet alphabetically on the dashboard.
The AExport worksheet started off like this:
Basically, you can put anything you want on this sheet. I then changed the transparency to 0% on the Color shelf, changed the default worksheet color to white, removed the row banding and removed the row and column dividers. The worksheet now looks like this:


- Create a worksheet that you want to export.
- Remove all of the formatting to make it look invisible.
- Be sure to give it a name that makes it first alphabetically on the dashboard.
- Place the worksheet on the dashboard, float it, make it fit the entire view, make it really small, move it somewhere inconspicuous.
- Add an image onto the dashboard, float it and add a URL to it that is the URL for the dashboard with .csv on the end.
This is a game changer!! Download the sample workbook here.
March 7, 2017
Tableau Tip Tuesday: How to Export a CSV from a TDE
csv
,
export
,
extract
,
Tableau Tip Tuesday
,
tde
4 comments

- Someone sends you a TDE
- You need the raw data, but the file wasn't provided
Getting the data out is much simpler than you think.
Step 1 - Connect to the TDE

Step 2 - Add Number of Records to the Text shelf

Step 3 - Right-click on the text in the worksheet and choose View Data...
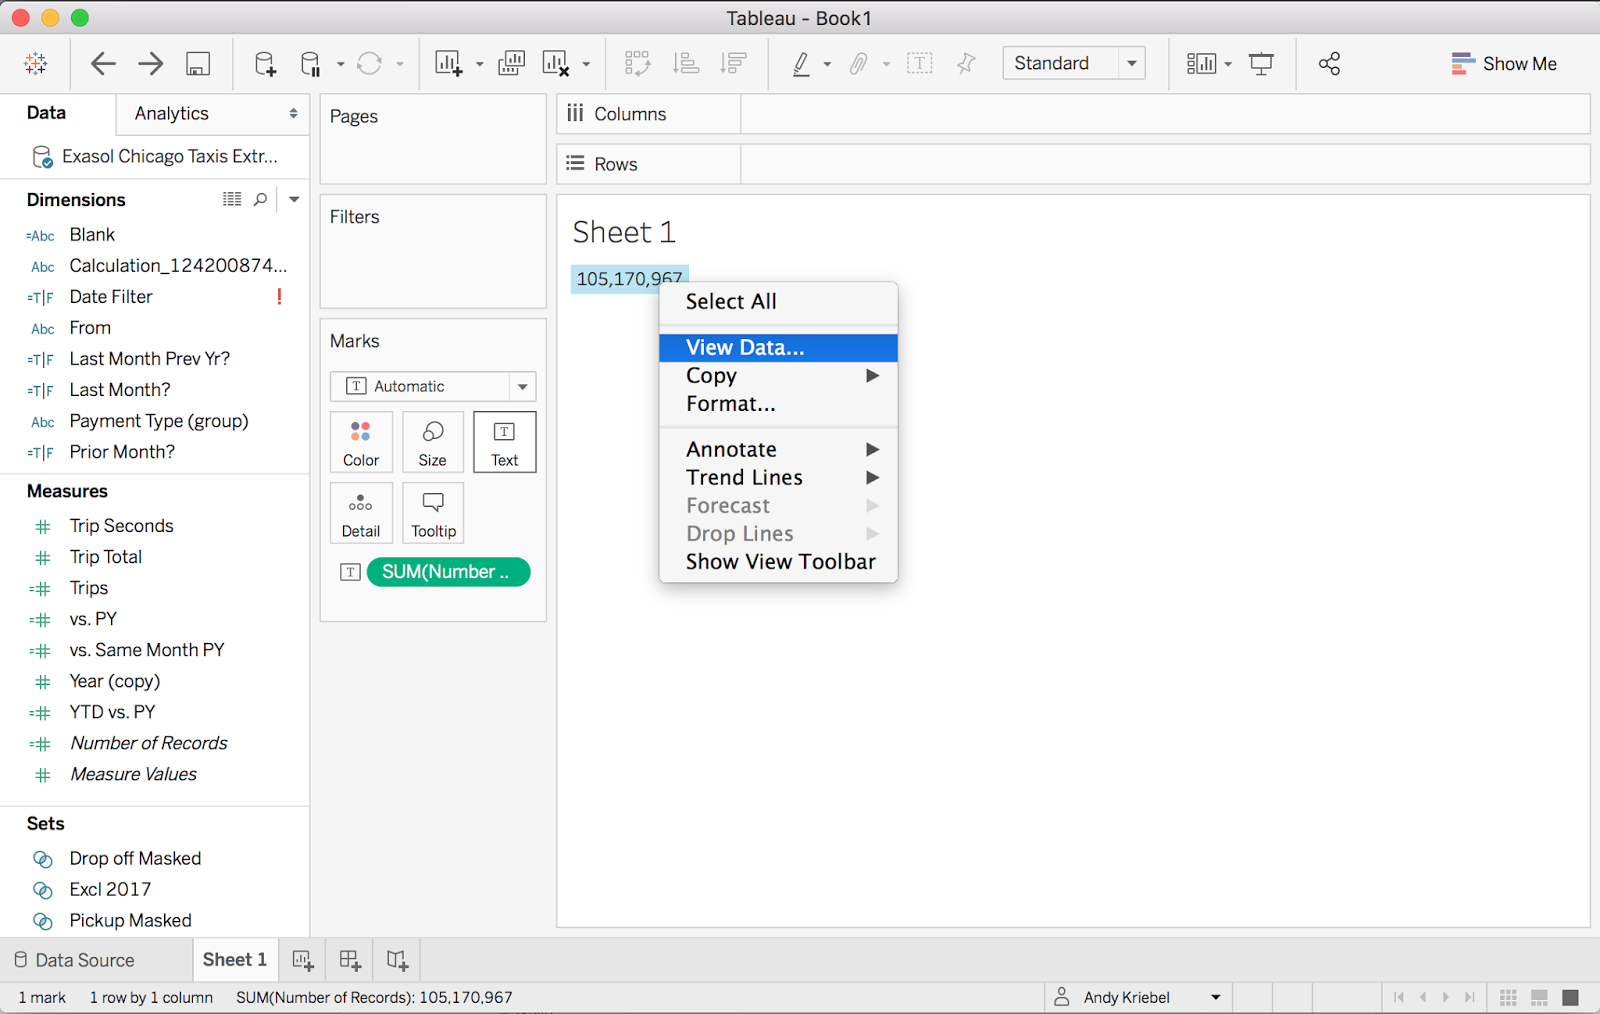
Step 4 - In the View Data window, click on the Full Data tab at the bottom.

Step 5 - Click the Export All button on the upper right

This will save all of the data as a CSV. That's it! I told you it was simple.
September 13, 2012
Tableau Tip: Exporting data from a dashboard on Tableau Server (or Public)
A request was made for a project I’m working on to allow the user/interactor to export the data on the dashboard into an Excel file from a dashboard that resides on Tableau Server.
I totally over complicated this request and was convinced that it couldn’t be done. I was trying to create a URL link to export the data, but then I suddenly remembered that scrawny export button on Tableau Server and Tableau Public.
Consider this dashboard that resides on Tableau Public:
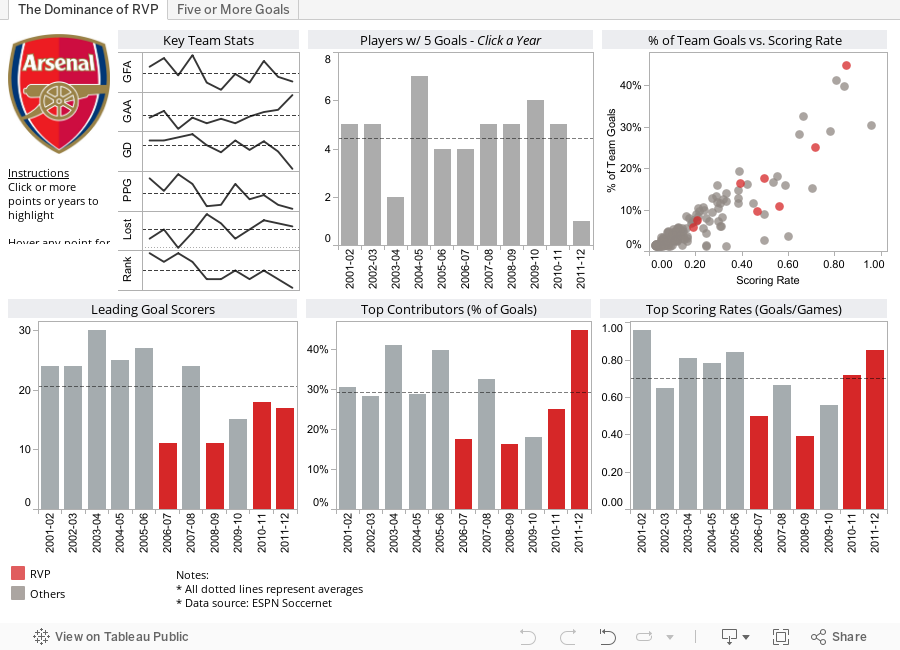 Look at the middle of the footer. Notice this little arrow pointing right. That’s the export button!

When you first click on it, it very well may look like this, where the Data and Crosstab options are disabled.

The trick is to click on the chart that has the data you want to export. You can’t export all of the data for the entire dashboard at the same time, but you can export the data for a single chart or table.
Once you click on a chart, you’ll see a light gray border appear around the chart and now when you click on the export link, the Data and Crosstab options are enabled.

Way too simple!
I totally over complicated this request and was convinced that it couldn’t be done. I was trying to create a URL link to export the data, but then I suddenly remembered that scrawny export button on Tableau Server and Tableau Public.
Consider this dashboard that resides on Tableau Public:

When you first click on it, it very well may look like this, where the Data and Crosstab options are disabled.

The trick is to click on the chart that has the data you want to export. You can’t export all of the data for the entire dashboard at the same time, but you can export the data for a single chart or table.
Once you click on a chart, you’ll see a light gray border appear around the chart and now when you click on the export link, the Data and Crosstab options are enabled.

Way too simple!
NOTES:
- The Data option displays a web page which shows a table of the data. You then have to click on the export link.
- If you want to directly download the data, click on the Crosstab option and you’ll get a nice clean CSV file.
Subscribe to:
Posts
(
Atom
)